
Uploading files is an integral part of most of the modern web applications.As most of the modern applications are backed by APIs, so we need to understandand get familiar with file uploads through APIs. Now the question arises whereshould we store the file? The easy answer is the local file system or withinour working directory. Yes, that is true but for a production-level applicationstoring files in the filesystem is not a good idea, and even if we do thatthere are overheads for managing the space, access rights, and above allsecurity. So there are couple of alternatives –
a) CDN – CDN stands for Content Delivery Network. It not only stores thedata but gives you efficient ways to access the data. But generally, they arecostly and there are few configuration mechanisms also involved.
b) Database – Store files in the Database. If you store it in a Database youwill have a transactional level control, whether the data is getting written ornot but the most obvious concern is the size and efficiency of the delivery ofthe image.c) Cloud Storage – Nowadays with the rising popularity of Cloud technologiesthe best place to store files is in cloud storage. You don’t need to worryabout space and security. You have full control over the access mechanism andalso the cost is relatively low and several cloud providers provide freestorage up to a certain threshold. The most popular of these Cloud Storages areAWS( Amazon Web Service) S3 (Simple Storage Service) or SimplyS3.
In this article, we will learn about how to upload a file through REST APIbuilt using Node.js and Typescript to upload files in S3
Pre-requisites –
- You must have an Account in AWS
- You must have Node.js installed in your machine most preferably the LTS version
So if you have AWS Account already created and Node.js installed on your machine lets get started.
Step-1 Creating bucket in S3 –
All your files that you are going to be uploaded to S3 bucket. So first task is to create the bucket. In AWS console search for S3 and then click on “Create Bucket” to create your first S3 bucket . Keep the following configuration while creating the S3 Bucket as shown in the screen shot below.
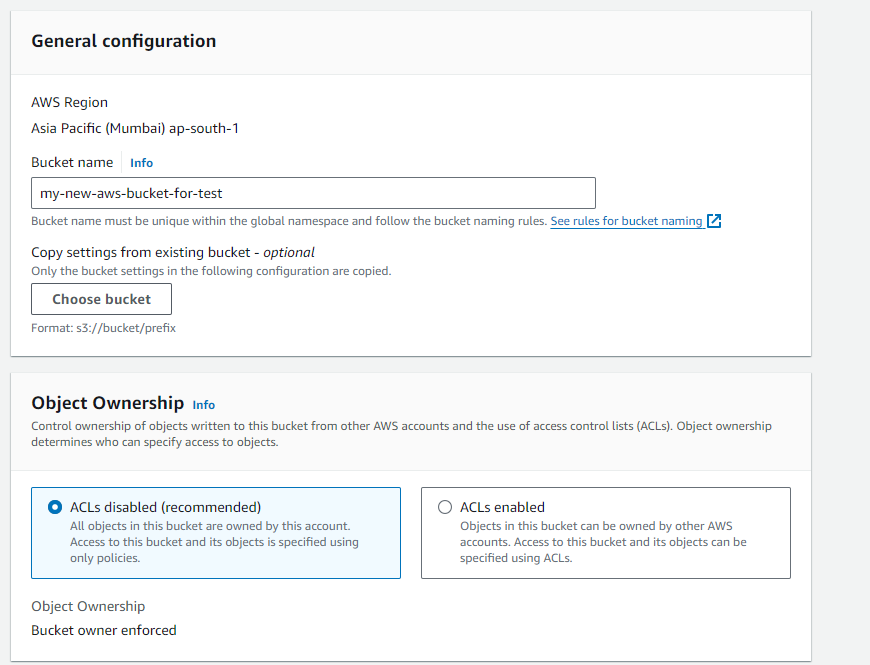


If the bucket is successfully created you should be able to see in the list of buckets.
The next step is to create an IAM user and credentials so that we can programmatically access S3 bucket. So let’s do that in the next step
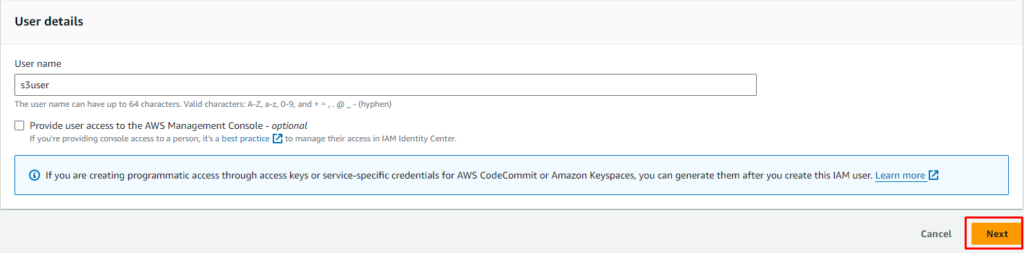
Step-2 Creating IAM User and Credentials for Programmatically Access S3 bucket
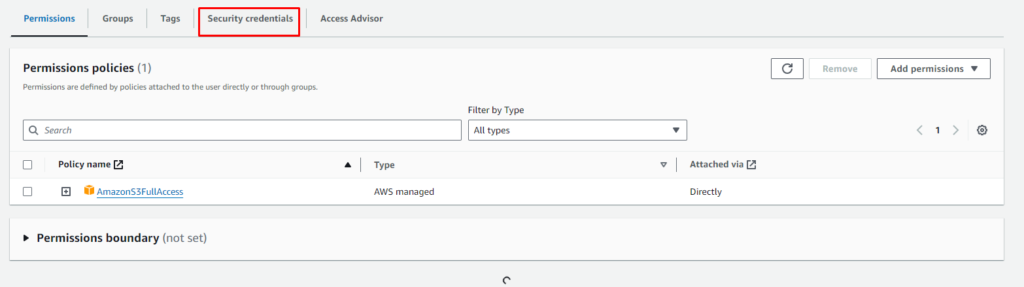
IAM Stands for Identity and Access Management. Lets’ create an User and then attach policy for S3 Access and then we will generate the credential for that user. It is always advisable not to use root user for any of your programming or CLI access. Checkout the screen shot below which will take you through the user creation process.
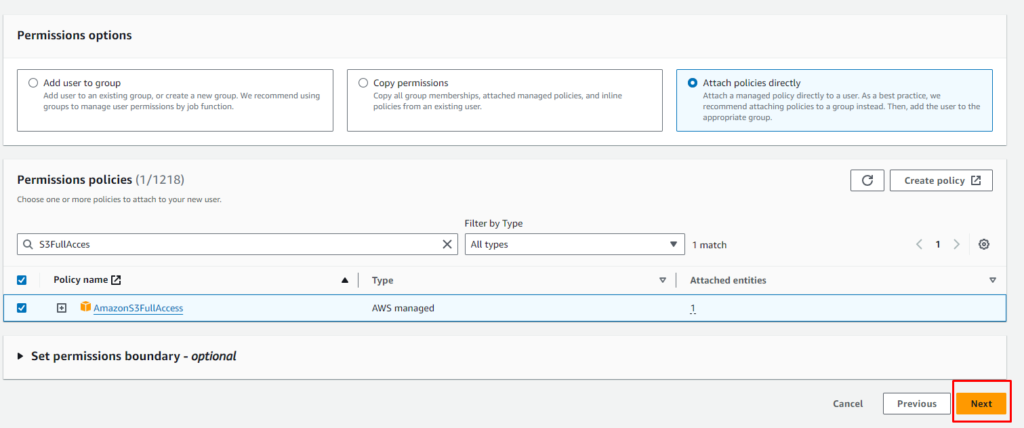

Once you successfully complete the above steps you should see the created user in the list. Next step is to generate the credentials as shown in below screen shots. Click on the user name in the list and follow the screen shots

As you are developing now so select Local Code option as shown in below screenshot
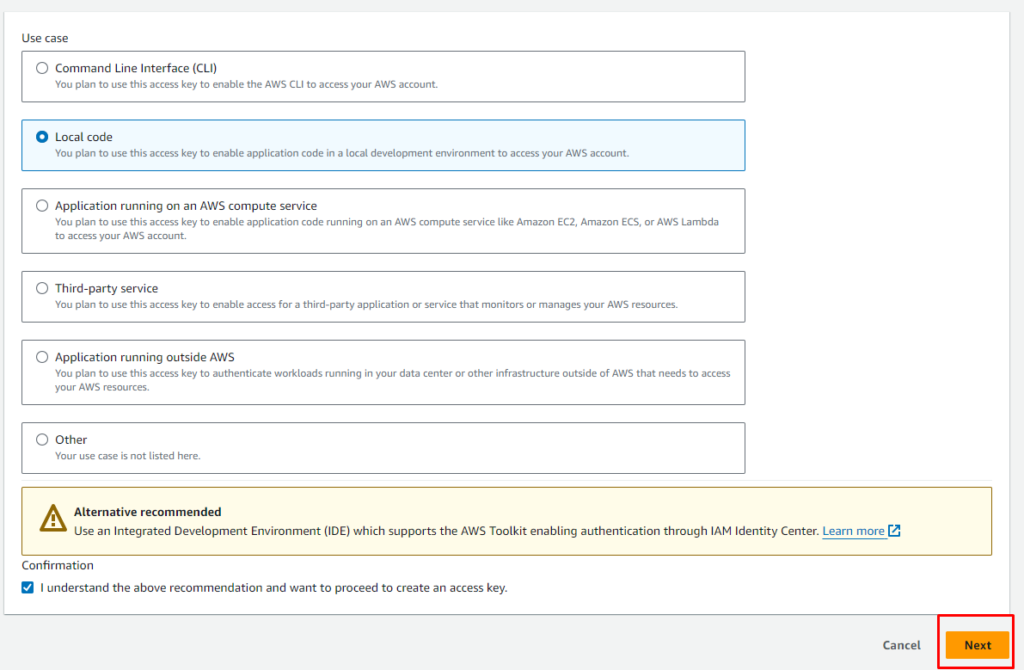


You should be able see the access key and secret access key just like the above screenshot. Copy both of them and save it somewhere. We will need these two keys while we code. Next step is to create an application for building the REST API for uploading files to S3
Step-3 Creating project folder and install dependencies –
Create a project folder “s3-upload” and then go inside the folder and then create package.json file by issuing the following command
npm init -yOnce the package.json file is created install the dependencies
npm i express multer multer-s3 @aws-sdk/client-s3Install dev dependencies
npm i -D @types/express @types/multer @types/multer-s3Next step is to create a tsconfig.json file in the root of your project folder
Step-4 Create tsconfig.json file
Create a file tsconfig,json in the root of your project folder and put the following code inside it
{
"compilerOptions": {
"target": "es2016",
"module": "commonjs",
"rootDir": "./src",
"outDir": "./dist",
"esModuleInterop": true,
"forceConsistentCasingInFileNames": true,
"strict": true,
"skipLibCheck": true
},
"include": ["src/**/*"],
"exclude": ["**/*.spec.ts"]
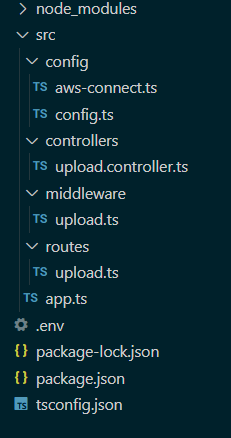
}Step-5 Folder Structure
A typical folder structure would look like the following screenshot
Step-6 Create .env file
Create a .env file and put it in the root of your project folder and put different config options inside the file.
#General Config
NODE_ENV=development
PORT=4000

#AWS Config
ACCESS_KEY=<Your AWS Access Key>
ACCESS_KEY_SECRET=<your AWS Secret Access Key>
REGION=<Your Region>
BUCKET_NAME=<Your bucket name>
Step-7 Creating the config file
Create a file config.ts under src/config and put the following code inside it
import "dotenv/config";

const config = {
  general: {
    nodeEnv: process.env.NODE_ENV,
    port: process.env.PORT,
  },
  aws: {
    accessKey: process.env.ACCESS_KEY,
    secretAccessKey: process.env.ACCESS_KEY_SECRET,
    region: process.env.REGION,
    bucket: process.env.BUCKET_NAME
  },
};

export default config;
Step-8 Create app.ts file
Create app.ts file under src folder and put the following code inside it
import express, { Application } from "express";
import config from "./config/config";

const app: Application = express();

const port = config.general.port;

app.listen(port, () => console.log(`Server started at port ${port}`));
Step-9 Create connection to AWS S3
Create a file aws-connect.ts under src/config folder and put the following code inside it. Remember we are using AWS JavaScript SDK Version 3 for this article
import { S3Client, S3ClientConfig } from "@aws-sdk/client-s3";
import config from "../config/config";
export function connectS3(): S3Client {
  try {
    const configuration: S3ClientConfig = {
      region: config.aws.region,
      credentials: {
        accessKeyId: config.aws.accessKey,
        secretAccessKey: config.aws.secretAccessKey,
      },
    };
    const s3Client: S3Client = new S3Client(configuration);
    return s3Client;
  } catch (err: any) {
    throw new Error("AWS Authentication Error");
  }
}
Next step is to construct the middleware for uploading files
Step-10 Building Generic Middleware for uploading files
Create a file upload.ts under src/middleware
import { Request, Response, NextFunction } from "express";
import multer, { StorageEngine } from "multer";
import multerS3 from "multer-s3";
import { connectS3 } from "../config/aws-connect";
import config from "../config/config";

const fileFilter = (req: Request, file: any, cb: any) => {
  if (
    file.mimetype.split("/")[0] === "image" ||
    file.mimetype.split("/")[1] == "pdf" ||
    file.mimetype.split("/")[1] == "plain"
  ) {
    cb(null, true);
  } else {
    cb(null, false);
    cb(new Error("File type not allowed"));
  }
};

export function uploadSingleFile(
  req: Request,
  res: Response,
  next: NextFunction
) {
  const storage: StorageEngine = multerS3({
    s3: connectS3(),
    bucket: config.aws.bucket,
    metadata: function (req, file, cb) {
      cb(null, { fieldName: file.fieldname });
    },
    key: function (req, file, cb) {
      cb(null, `${Date.now()}-${file.originalname}`);
    },
  });

  const fieldname: string = req.headers["fieldname"].toString();
  const fileUpload = multer({ storage, fileFilter }).single(fieldname);

  fileUpload(req, res, (err: any) => {
    if (!req.file) {
      return res.status(400).json({
        message: `File missing`,
      });
    }
    if (err) {
      if (err instanceof multer.MulterError) {
        return res.status(400).json({
          message: `Something went wrong with Multer file upload -${err.message}`,
        });
      }
      return res.status(400).json({
        message: `Something went wrong with file upload -${err.message}`,
      });
    }
    next();
  });
}

export function uploadMultipleFile(
  req: Request,
  res: Response,
  next: NextFunction
) {
  const storage: StorageEngine = multerS3({
    s3: connectS3(),
    bucket: config.aws.bucket,
    metadata: function (req, file, cb) {
      cb(null, { fieldName: file.fieldname });
    },
    key: function (req, file, cb) {
      cb(null, `${Date.now()}-${file.originalname}`);
    },
  });

  const fieldname: string = req.headers["fieldname"].toString();
  const fileUpload = multer({ storage }).array(fieldname);

  fileUpload(req, res, (err: any) => {
    if (err) {
      return res.status(500).json({
        message: "Something went wrong with file upload - ${err.message}",
      });
    }
    next();
  });
}
Here in the above file we have created two functions uploadSingleFile and uploadMultipleFile . They are respectively used for single and multiple file uploads. The fileFilter function checks the MimeType of the file and then allow or reject based of the type of file being uplaoded. You can add as many MimeType as you want based on the nature of your application.
For more details about multer file upload you can check the following article
Now let’s construct the controller for uploading the file(s)
Step-11 Creating controller
Create a file upload.controller.ts under src/controllers and put the following code inside it
import { Request, Response } from "express";

export async function uploadFiles(req: Request, res: Response) {
  try {
    return res.status(201).json({
      message: `File Uplaoded Successfully`,
    });
  } catch (err: any) {
    return res.status(err.statusCode).json({
      message: `Something went wrong while uploading files -${err.message}`,
    });
  }
}
Step-12 Finally creating routes
Create a file upload.ts under src/routes and the put the following code inside it
import express, { Router } from "express";
import { uploadFiles } from "../controllers/upload.controller";
import { uploadSingleFile, uploadMultipleFile } from "../middleware/upload";

const routes: Router = express.Router();

/** Route for Uploading Single File */
routes.post("/single", uploadSingleFile, uploadFiles);

/** Route for Uploading Multiple Files */
routes.post("/multi", uploadMultipleFile, uploadFiles);

export default routes;
And that’s it. Now we need to test our code using postman
Step-13 Calling the routes from our app.ts
Now we need to include our routes in app.ts file . So the modified file looks like as below
import express, { Application } from "express";
import config from "./config/config";
import uploadRoute from "./routes/upload";

const app: Application = express();

app.use(express.json());
app.use(express.urlencoded({ extended: true }));

app.use("/api/v1/upload", uploadRoute);

const port = config.general.port;

app.listen(port, () => console.log(`Server started at port ${port}`));
Step-14 create script is package.json
As a final step add the following line under scripts and you are good to test the API
"dev": "tsc&& node dist/app.js"Test the API in POSTMAN
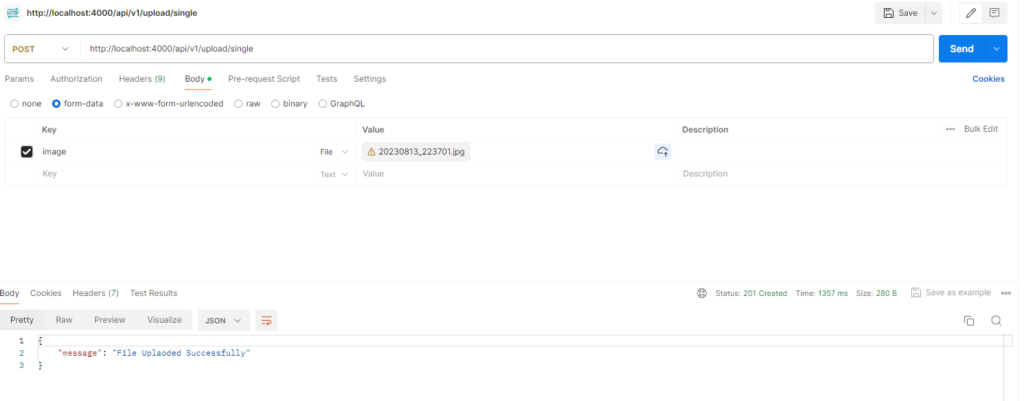
To test the API we will use “form-data” . In the “Headers” use key as fieldname and in the “Body” use the value of fieldname that you have used in the “Header” section. as show in below screenshot

Here in postman the Header key is fieldname and value is “image”. Use this value “image” as the key in your Body section as shown in below screenshot

Now press submit and you should see success message as shown below
Note that the value of fieldname and field for file upload is same because we wanted to make our file upload middleware a generic one so that you don’t need to use separate middleware’s for different file upload .
Happy Coding!!!